<include>标签
post by:追风剑情 2016-6-15 17:40
示例一
include_layout.xml
<?xml version="1.0" encoding="utf-8"?>
<LinearLayout xmlns:android="http://schemas.android.com/apk/res/android"
    android:layout_width="match_parent"
    android:layout_height="match_parent"
    android:orientation="vertical" >

	<include layout="@layout/sub_layout" />
</LinearLayout>
你可以重写已包含布局的根视图的layout_*属性,只有android:layout_*属性和android:id属性可以被重写,所有其他属性都会被忽略。新的属性将会被应用到被包含布局的根节点上。
注意:如果你想重写android:layout_*属性中的一个,那么你必须重写android:layout_width和android:layout_height属性。否则,系统将无法使用新布局属性。这也需要适当调整布局容器里包含的视图(例如,一个LinearLayout)。
如果需要重写sub_layout的id、layout_width、layout_height属性,可以这样写
<?xml version="1.0" encoding="utf-8"?>
<LinearLayout xmlns:android="http://schemas.android.com/apk/res/android"
    android:layout_width="match_parent"
    android:layout_height="match_parent"
    android:orientation="vertical" >

	<include
	    android:id="@+id/sub_id"
	    android:layout_width="match_parent"
	    android:layout_height="wrap_content"
	    layout="@layout/sub_layout" />
</LinearLayout>
sub_layout.xml
<?xml version="1.0" encoding="utf-8"?>
<TextView xmlns:android="http://schemas.android.com/apk/res/android"
    android:layout_width="match_parent"
    android:layout_height="match_parent"
    android:text="Hello World!" >

</TextView>
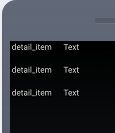
运行效果
示例二
task_detail.xml
<?xml version="1.0" encoding="utf-8"?>
<LinearLayout xmlns:android="http://schemas.android.com/apk/res/android"
    android:layout_width="match_parent"
    android:layout_height="match_parent"
    android:orientation="vertical" >

	<include
	    android:id="@+id/task_name"
	    android:layout_width="match_parent"
	    android:layout_height="wrap_content"
	    android:layout_marginBottom="20dp"
	    layout="@layout/detail_item"/>

	<include
	    android:id="@+id/task_date"
	    android:layout_width="match_parent"
	    android:layout_height="wrap_content"
	    android:layout_marginBottom="20dp"
	    layout="@layout/detail_item"/>

	<include
	    android:id="@+id/task_desc"
	    android:layout_width="match_parent"
	    android:layout_height="wrap_content"
	    android:layout_marginBottom="20dp"
	    layout="@layout/detail_item"/>
</LinearLayout>
detail_item.xml
<?xml version="1.0" encoding="utf-8"?>
<LinearLayout xmlns:android="http://schemas.android.com/apk/res/android"
    android:id="@+id/name"
    android:layout_width="match_parent"
    android:layout_height="wrap_content"
    android:orientation="horizontal"
    android:gravity="center_horizontal"
    android:paddingLeft="3dp"
    android:paddingRight="3dp" >

	<TextView
	    android:id="@+id/name1"
	    android:layout_width="0dp"
	    android:layout_height="wrap_content"
	    android:layout_weight="1"
	    android:text="@string/detail_name"/>

	<TextView
	    android:id="@+id/text"
	    android:layout_width="0dp"
	    android:layout_height="wrap_content"
	    android:layout_weight="3"
	    android:text="Text"/>
</LinearLayout>
注意:Activity.findViewById()与View.findViewById()的区别,View.findViewById()只搜索该视图的子视图。
运行测试
评论:
发表评论:

