两侧渐变
作者:追风剑情 发布于:2019-11-19 13:08 分类:Shader
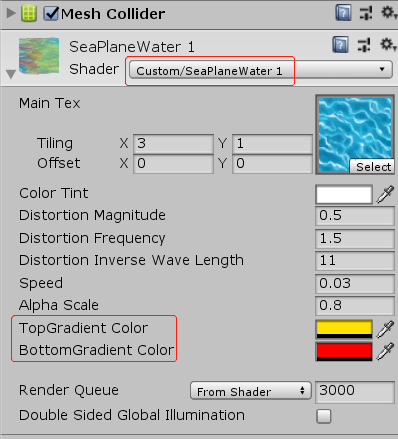
一、工程截图
// 支持顶部与底部同时渐变
Shader "Custom/SeaPlaneWater 1" {
	Properties{
		//河流纹理
		_MainTex("Main Tex", 2D) = "white" {}
		//控制整体颜色
		_Color("Color Tint", Color) = (1, 1, 1, 1)
		//控制水流波动的幅度
		_Magnitude("Distortion Magnitude", float) = 1
		//控制波动频率
		_Frequency("Distortion Frequency", float) = 1
		//控制波长的倒数(值越大,波长越小)
		_InvWaveLength("Distortion Inverse Wave Length", float) = 10
		//控制河流纹理的移动速度
		_Speed("Speed", float) = 0.5
		_AlphaScale("Alpha Scale", float) = 1.0
		//渐变颜色
		_GradientTopColor("TopGradient Color", Color) = (1, 0, 0, 0)
		//渐变颜色
		_GradientBottomColor("BottomGradient Color", Color) = (1, 0, 0, 0)
	}
		SubShader{
		//本示例需要在模型空间实现顶点动画,所以需要关闭批处理。
		//"DisableBatching"="True"关闭批处理,这是因为批处理会合并所有相关的模型,而这些模型各自的模型空间就会丢失。
		Tags { "Queue" = "Transparent" "IgnoreProjector" = "True" "RenderType" = "Transparent" "DisableBatching" = "True" }
		LOD 200

		Pass {
			Tags {"LightMode" = "ForwardBase"}
			//这里关闭了深度写入,开启并设置了混合模式,并关闭了剔除功能。这是为了让水流的每个面都能显示
			ZWrite Off
			Blend SrcAlpha OneMinusSrcAlpha
			Cull Off

			CGPROGRAM
			#pragma vertex vert
			#pragma fragment frag
			#pragma multi_compile_fog
			#include "UnityCG.cginc"
			#include "Lighting.cginc"

			sampler2D _MainTex;
			float4 _MainTex_ST;
			float4 _Color;
			float _Magnitude;
			float _Frequency;
			float _InvWaveLength;
			float _Speed;
			float _AlphaScale;
			fixed4 _GradientTopColor;
			fixed4 _GradientBottomColor;

			struct a2v {
				float4 vertex : POSITION;
				float4 texcoord : TEXCOORD0;
			};

			struct v2f {
				float4 pos : SV_POSITION;
				half2 uv : TEXCOORD0;
				UNITY_FOG_COORDS(1)
			};

			v2f vert(a2v v)
			{
				v2f o;
				float4 offset;
				//只希望对顶点的x方向进行位移,因此yzw的位移量被设置为0
				offset.yzw = float3(0.0, 0.0, 0.0);
				//然后,利用_Frequency属性和内置的_Time.y变量来控制正弦函数的频率。
				//为了让不同位置具有不同的位移,我们对上述结果加上了模型空间下的位置分量,并乘以_InvWaveLength来控制波长。
				//最后,我们对结果值乘以_Magnitude属性来控制波动幅度,得到最终位移。
				offset.x = sin(_Frequency * _Time.y + v.vertex.x * _InvWaveLength + v.vertex.y * _InvWaveLength + v.vertex.z * _InvWaveLength) * _Magnitude;
				//剩下的工作,我们只需要把位移量添加到顶点位置上,再进行正常的顶点变换即可。
				o.pos = UnityObjectToClipPos(v.vertex + offset);
				o.uv = TRANSFORM_TEX(v.texcoord, _MainTex);
				o.uv += float2(0.0, _Time.y * _Speed);
				UNITY_TRANSFER_FOG(o, o.pos);
				return o;
			}

			//片元着色器的代码非常简单,只需要对纹理采样再添加颜色控制即可
			fixed4 frag(v2f i) : SV_Target
			{
				fixed4 c = tex2D(_MainTex, i.uv);
				c.rgb *= _Color.rgb;
				c.a *= _AlphaScale;

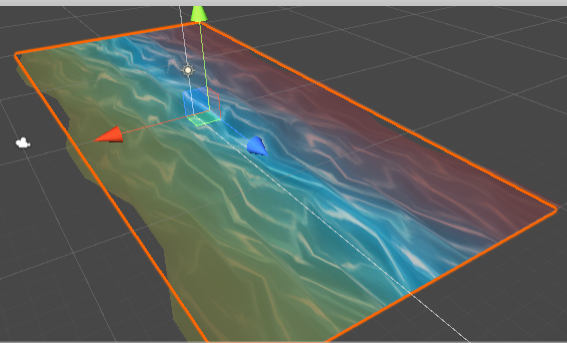
				//两侧渐变
				fixed center_x = _MainTex_ST.x / 2;
				fixed s = step(i.uv.x, center_x);
				fixed4 gradientColor = _GradientTopColor * s + _GradientBottomColor * (1 - s);
				fixed t = abs(i.uv.x - center_x);
				c = lerp(c, gradientColor, t / 2);

				UNITY_APPLY_FOG(i.fogCoord, c);
				return c;
			}
			ENDCG
		}
	}
		//也可以关闭Fallback
				FallBack "Transparent/VertexLit"
}
效果
标签: Shader
日历
最新文章
随机文章
热门文章
分类
存档
- 2025年2月(3)
- 2025年1月(1)
- 2024年12月(5)
- 2024年11月(5)
- 2024年10月(5)
- 2024年9月(3)
- 2024年8月(3)
- 2024年7月(11)
- 2024年6月(3)
- 2024年5月(9)
- 2024年4月(10)
- 2024年3月(11)
- 2024年2月(24)
- 2024年1月(12)
- 2023年12月(3)
- 2023年11月(9)
- 2023年10月(7)
- 2023年9月(2)
- 2023年8月(7)
- 2023年7月(9)
- 2023年6月(6)
- 2023年5月(7)
- 2023年4月(11)
- 2023年3月(6)
- 2023年2月(11)
- 2023年1月(8)
- 2022年12月(2)
- 2022年11月(4)
- 2022年10月(10)
- 2022年9月(2)
- 2022年8月(13)
- 2022年7月(7)
- 2022年6月(11)
- 2022年5月(18)
- 2022年4月(29)
- 2022年3月(5)
- 2022年2月(6)
- 2022年1月(8)
- 2021年12月(5)
- 2021年11月(3)
- 2021年10月(4)
- 2021年9月(9)
- 2021年8月(14)
- 2021年7月(8)
- 2021年6月(5)
- 2021年5月(2)
- 2021年4月(3)
- 2021年3月(7)
- 2021年2月(2)
- 2021年1月(8)
- 2020年12月(7)
- 2020年11月(2)
- 2020年10月(6)
- 2020年9月(9)
- 2020年8月(10)
- 2020年7月(9)
- 2020年6月(18)
- 2020年5月(4)
- 2020年4月(25)
- 2020年3月(38)
- 2020年1月(21)
- 2019年12月(13)
- 2019年11月(29)
- 2019年10月(44)
- 2019年9月(17)
- 2019年8月(18)
- 2019年7月(25)
- 2019年6月(25)
- 2019年5月(17)
- 2019年4月(10)
- 2019年3月(36)
- 2019年2月(35)
- 2019年1月(28)
- 2018年12月(30)
- 2018年11月(22)
- 2018年10月(4)
- 2018年9月(7)
- 2018年8月(13)
- 2018年7月(13)
- 2018年6月(6)
- 2018年5月(5)
- 2018年4月(13)
- 2018年3月(5)
- 2018年2月(3)
- 2018年1月(8)
- 2017年12月(35)
- 2017年11月(17)
- 2017年10月(16)
- 2017年9月(17)
- 2017年8月(20)
- 2017年7月(34)
- 2017年6月(17)
- 2017年5月(15)
- 2017年4月(32)
- 2017年3月(8)
- 2017年2月(2)
- 2017年1月(5)
- 2016年12月(14)
- 2016年11月(26)
- 2016年10月(12)
- 2016年9月(25)
- 2016年8月(32)
- 2016年7月(14)
- 2016年6月(21)
- 2016年5月(17)
- 2016年4月(13)
- 2016年3月(8)
- 2016年2月(8)
- 2016年1月(18)
- 2015年12月(13)
- 2015年11月(15)
- 2015年10月(12)
- 2015年9月(18)
- 2015年8月(21)
- 2015年7月(35)
- 2015年6月(13)
- 2015年5月(9)
- 2015年4月(4)
- 2015年3月(5)
- 2015年2月(4)
- 2015年1月(13)
- 2014年12月(7)
- 2014年11月(5)
- 2014年10月(4)
- 2014年9月(8)
- 2014年8月(16)
- 2014年7月(26)
- 2014年6月(22)
- 2014年5月(28)
- 2014年4月(15)
友情链接
- Unity官网
- Unity圣典
- Unity在线手册
- Unity中文手册(圣典)
- Unity官方中文论坛
- Unity游戏蛮牛用户文档
- Unity下载存档
- Unity引擎源码下载
- Unity服务
- Unity Ads
- wiki.unity3d
- Visual Studio Code官网
- SenseAR开发文档
- MSDN
- C# 参考
- C# 编程指南
- .NET Framework类库
- .NET 文档
- .NET 开发
- WPF官方文档
- uLua
- xLua
- SharpZipLib
- Protobuf-net
- Protobuf.js
- OpenSSL
- OPEN CASCADE
- JSON
- MessagePack
- C在线工具
- 游戏蛮牛
- GreenVPN
- 聚合数据
- 热云
- 融云
- 腾讯云
- 腾讯开放平台
- 腾讯游戏服务
- 腾讯游戏开发者平台
- 腾讯课堂
- 微信开放平台
- 腾讯实时音视频
- 腾讯即时通信IM
- 微信公众平台技术文档
- 白鹭引擎官网
- 白鹭引擎开放平台
- 白鹭引擎开发文档
- FairyGUI编辑器
- PureMVC-TypeScript
- 讯飞开放平台
- 亲加通讯云
- Cygwin
- Mono开发者联盟
- Scut游戏服务器引擎
- KBEngine游戏服务器引擎
- Photon游戏服务器引擎
- 码云
- SharpSvn
- 腾讯bugly
- 4399原创平台
- 开源中国
- Firebase
- Firebase-Admob-Unity
- google-services-unity
- Firebase SDK for Unity
- Google-Firebase-SDK
- AppsFlyer SDK
- android-repository
- CQASO
- Facebook开发者平台
- gradle下载
- GradleBuildTool下载
- Android Developers
- Google中国开发者
- AndroidDevTools
- Android社区
- Android开发工具
- Google Play Games Services
- Google商店
- Google APIs for Android
- 金钱豹VPN
- TouchSense SDK
- MakeHuman
- Online RSA Key Converter
- Windows UWP应用
- Visual Studio For Unity
- Open CASCADE Technology
- 慕课网
- 阿里云服务器ECS
- 在线免费文字转语音系统
- AI Studio
- 网云穿
- 百度网盘开放平台
- 迅捷画图
- 菜鸟工具
- [CSDN] 程序员研修院
- 华为人脸识别
- 百度AR导航导览SDK
- 海康威视官网
- 海康开放平台
- 海康SDK下载
- git download
- Open CASCADE
- CascadeStudio
交流QQ群
-
Flash游戏设计: 86184192
Unity游戏设计: 171855449
游戏设计订阅号


